A guide for GW2 Guild Challenge, part of Guild Missions introduced with the February update.
To be able to research Guild Challenge, you have have Guild Bounty, Trek, and Rush unlocked previously. You will also need 50k influence and 150 merits to start researching.
Guild Challenges are guild missions designed for groups of 10+ players but can be incredibly easy when done with larger group of players. There are six possible Guild Challenge scenarios. Once you started a Guild Challenge scenario, you have 5 hours to successfully complete the group event associated with the challenge to reap the rewards.
Rewards: Once completed, Guild Challenges will reward 30 Guild Merits for the guild. Personal rewards include 2 Guild Commendations, 2 rare items, and 50 silver.

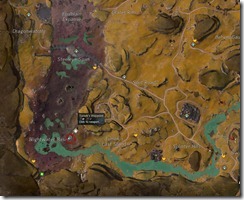
Blightwater Shatterstrike – Blazeridge Steppes
Description: Brand energies coursing through crystal nodes along Blightwater Basin in Blazeridge Steppes are reaching critical levels. Work together to destroy these crystal nodes and stop the energy buildup.

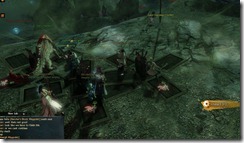
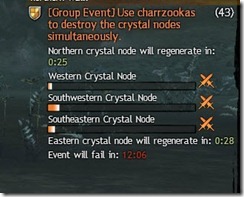
[Group Event] Use charrzookas to destroy the crystal nodes simultaneously.
Branded For Termination – Fields of Ruin
Description: Find and bring down a Branded ogre chieftain and his pet siege devourers in Varim’s Run in the Fields of Ruin.


[Group Event] Defeat the Branded ogre and his Branded devourer pets
The idea to kill all 3 targets within 30 seconds of each other. Once one of the targets is killed, you have 30 seconds to kill the other two before the first one revives (back to 50% HP). You have 15 minutes to complete this before the event fails.

The main thing you have to watch for with the Branded Ogre is when he jumps in the air and throw down a conal shockwave punch. It hurt quite a bit (can one shot some players) and put 9 stacks of Bleed on whoever get hit by it. The Ogre does have more HP compared to the devourers so put more players on him if you need to.
For the Devourers, they have a siege attack that you need to dodge. You won’t get one shotted by this attack but it will put a Burning debuff on you.

Deep Trouble – Mount Maelstrom
Description: Krait have taken quaggans captive for ritual sacrifice in the Mire Sea in the Mount Maelstrom region. Rescue the captive quaggans before the krait execute them.


[Group Event] Rescue the captives before they are executed by the krait.
Quaggans that are still bound cannot be attacked so you don’t have to worry about them. You can split your guild into multi-groups and do this in waves, with finished groups coming back to escort another quaggan.
Save Our Supplies– Iron Marches
Description: Supply Master Sootspliter needs your help defending Iron Legion supplies bound for the front lines in Iron Marches. Help shore up his supply depot’s defenses and repel any Flame Legion attacks.


[Group Event] Defend the Iron Legion supply depot against Flame Legion attack.
Defense
You can build turrets, mortars, and mines to protect the fort against the Flame Legion onslaught. Keep in mind that only one upgrade can be build at a time so plan your upgrades accordingly. I personally did not find much use for the Mortars and Mines but the turrets were really useful.
Turrets: The first thing you will notice once you start the challenge is the turrets that you can build. There are about 5-6 of them. You first must activate them and then you can build upgrades such as increased ammo capacity, caltrop shots, and naplam shots. Turrets are really good and can damage large groups from a distance.


Mortars and Mines: Right by the Supply Master are two shelves. One containing Mortar Shells and the other containing Unarmed Land Mines. You can bring the Mortar Shells to mortars around the fort to activate them. Land Mines can be placed in chokepoints to stop advancing Flame Legion attackers. If you run out of Mortar and Land Mines, you can ask the Supply Master to build more of them.

Enemies and Chokepoints
Flame Legion attackers mostly come from the south and north side of the fort. North side is a narrow passage that serve as a chokepoint that can be maintained by a small group. South side is a bit more wide open and will require a larger group to defend.


Flame Legion mobs have stealthers and archers that attack from a distance so make sure you have players guard the barrels against stealthers and players running out to kill the ranged mobs.
Scratch Sentry Defense– Timberline Falls
Description: An experimental device has enraged various creatures around Fionnghuala Scratch in Timberline Falls, Defend the skritt sentries stationed outside the scratch until the researchers can shut down the device.


[Group Event] Defend the three skritt sentries from invading waves of enraged ettins, jotun, and spiders.
This is a fairly simple Guild Challenge. There are two skritt sentries up in the north and one in the south. You will get four waves of mobs. First wave is mostly regular mobs and some veterans but the number of veterans and champions increases each wave. The fourth wave will have you fight against a bunch of veterans and champions at the same time. The event will fail if one skritt sentry dies.
The two sentries at the north are connected via tunnel so a single group with some backup can probably hold on two both sentries. Becareful to not venture too far into the tunnel as mobs can spawn behind you and head to the skritt sentries right away.
The south sentry have a lot of ettins while the north ones are mostly spiders and jotuns, something to keep in mind if you are going after slayer achievements.
Southsun Crab Toss – Southsun Cove
Description: A crab-hunting quaggan needs your help to keep her catch alive on Southsun Cove while the karka close in.


[Group Event] Fend off attacking karka and keep Fralloo’s crab alive inside the circle

Karkas will spawn to attack the carrier with a veteran and champion karka spawning later on. Everyone will need to defend the carrier until the timer ends.
Credits
Special thanks to members of following guilds for their assistance in compiling this guide
Полностью
- Basics
- Blightwater Shatterstrike
- Branded for Termination
- Deep Trouble (work in progress)
- Save Our Supplies
- Scratch Sentry Defense
- Southsun Crab Toss
To be able to research Guild Challenge, you have have Guild Bounty, Trek, and Rush unlocked previously. You will also need 50k influence and 150 merits to start researching.
Guild Challenges are guild missions designed for groups of 10+ players but can be incredibly easy when done with larger group of players. There are six possible Guild Challenge scenarios. Once you started a Guild Challenge scenario, you have 5 hours to successfully complete the group event associated with the challenge to reap the rewards.
Rewards: Once completed, Guild Challenges will reward 30 Guild Merits for the guild. Personal rewards include 2 Guild Commendations, 2 rare items, and 50 silver.

Blightwater Shatterstrike – Blazeridge Steppes
Description: Brand energies coursing through crystal nodes along Blightwater Basin in Blazeridge Steppes are reaching critical levels. Work together to destroy these crystal nodes and stop the energy buildup.


[Group Event] Use charrzookas to destroy the crystal nodes simultaneously.
- Duration: 20 minutes or less


Branded For Termination – Fields of Ruin
Description: Find and bring down a Branded ogre chieftain and his pet siege devourers in Varim’s Run in the Fields of Ruin.


[Group Event] Defeat the Branded ogre and his Branded devourer pets
- Duration: 15 minutes or less
The idea to kill all 3 targets within 30 seconds of each other. Once one of the targets is killed, you have 30 seconds to kill the other two before the first one revives (back to 50% HP). You have 15 minutes to complete this before the event fails.

The main thing you have to watch for with the Branded Ogre is when he jumps in the air and throw down a conal shockwave punch. It hurt quite a bit (can one shot some players) and put 9 stacks of Bleed on whoever get hit by it. The Ogre does have more HP compared to the devourers so put more players on him if you need to.
For the Devourers, they have a siege attack that you need to dodge. You won’t get one shotted by this attack but it will put a Burning debuff on you.

Deep Trouble – Mount Maelstrom
Description: Krait have taken quaggans captive for ritual sacrifice in the Mire Sea in the Mount Maelstrom region. Rescue the captive quaggans before the krait execute them.


[Group Event] Rescue the captives before they are executed by the krait.
- 10 minutes
Quaggans that are still bound cannot be attacked so you don’t have to worry about them. You can split your guild into multi-groups and do this in waves, with finished groups coming back to escort another quaggan.
Save Our Supplies– Iron Marches
Description: Supply Master Sootspliter needs your help defending Iron Legion supplies bound for the front lines in Iron Marches. Help shore up his supply depot’s defenses and repel any Flame Legion attacks.


[Group Event] Defend the Iron Legion supply depot against Flame Legion attack.
- Duration: 11 minutes and 40 seconds
Defense
You can build turrets, mortars, and mines to protect the fort against the Flame Legion onslaught. Keep in mind that only one upgrade can be build at a time so plan your upgrades accordingly. I personally did not find much use for the Mortars and Mines but the turrets were really useful.
Turrets: The first thing you will notice once you start the challenge is the turrets that you can build. There are about 5-6 of them. You first must activate them and then you can build upgrades such as increased ammo capacity, caltrop shots, and naplam shots. Turrets are really good and can damage large groups from a distance.


Mortars and Mines: Right by the Supply Master are two shelves. One containing Mortar Shells and the other containing Unarmed Land Mines. You can bring the Mortar Shells to mortars around the fort to activate them. Land Mines can be placed in chokepoints to stop advancing Flame Legion attackers. If you run out of Mortar and Land Mines, you can ask the Supply Master to build more of them.

Enemies and Chokepoints
Flame Legion attackers mostly come from the south and north side of the fort. North side is a narrow passage that serve as a chokepoint that can be maintained by a small group. South side is a bit more wide open and will require a larger group to defend.


Flame Legion mobs have stealthers and archers that attack from a distance so make sure you have players guard the barrels against stealthers and players running out to kill the ranged mobs.
Scratch Sentry Defense– Timberline Falls
Description: An experimental device has enraged various creatures around Fionnghuala Scratch in Timberline Falls, Defend the skritt sentries stationed outside the scratch until the researchers can shut down the device.


[Group Event] Defend the three skritt sentries from invading waves of enraged ettins, jotun, and spiders.
This is a fairly simple Guild Challenge. There are two skritt sentries up in the north and one in the south. You will get four waves of mobs. First wave is mostly regular mobs and some veterans but the number of veterans and champions increases each wave. The fourth wave will have you fight against a bunch of veterans and champions at the same time. The event will fail if one skritt sentry dies.
The two sentries at the north are connected via tunnel so a single group with some backup can probably hold on two both sentries. Becareful to not venture too far into the tunnel as mobs can spawn behind you and head to the skritt sentries right away.
The south sentry have a lot of ettins while the north ones are mostly spiders and jotuns, something to keep in mind if you are going after slayer achievements.
Southsun Crab Toss – Southsun Cove
Description: A crab-hunting quaggan needs your help to keep her catch alive on Southsun Cove while the karka close in.


[Group Event] Fend off attacking karka and keep Fralloo’s crab alive inside the circle
- Duration: 5 minutes

Karkas will spawn to attack the carrier with a veteran and champion karka spawning later on. Everyone will need to defend the carrier until the timer ends.
Credits
Special thanks to members of following guilds for their assistance in compiling this guide
- Immortals Reawakened on Yak’s Bend
- Midnight Mayhem on Gunnar’s Hold
Полностью
